I’m not an artist

Yes, I paint.
And yes, I write, and I knit, and I create adorable rubber stamps.
It is true that I will not allow myself to be stagnate
As if my heart urges me to continue my creation.

However, I shall not call myself an artist, nor a writer, nor a painter.
Oh, how these titles burn me with shame.
It is a cross too heavy for me to carry, a crown that does not fit.
This is not humbleness, for there is no necessity to be humble if I
do not have the talent that deserves to be bragged about.
Simply look back in the history, or around, in a gallery.
There are astounding creations:
ideas that no one could match; techniques that no one shall compete.
There are masters, geniuses, with whom the only thing I could match is dedication
(if even that.)

And myself? Yes, I paint, I write, I knit, and I create adorable rubber stamps.
But an artist? No, thank you.
I appreciate the appreciation.

On the bed, on the floor, in a chair… build your comfortable workspace in five minutes!

A good work space should allow you a certain amount of privacy even though there might be other people or things around as potential distractions. It should not trigger any strong negative emotions from you, such as irritation, frustration, sadness or insecurity.

Although we all hope we have an undisturbed personal studio that can be fully dedicated to arts and crafts, the reality rarely meets such idealism. Most of us have a family to tender to, others have job or school. We go online and look at the average monthly rent of a studio, and we refuse to pay that certain amount for somewhere we might only stay for a couple hours each week.
This determines that most of us who duel identity of an artist and an ordinary person with duties suffer the uncertainty of working at in shared space. Sometimes our neighbors decide to abuse their right of freedom and blow your house with low-frequency beat and vulgar “music”. Sometimes your kid runs around and bumps over your color plate (ouch!)ouch! The other times, the house simply looks too messy for you to sit down and do some creation- you feel the urgency if mop and sweep and fold the clothes, etc…
Therefore, I’d like to share some useful tips that will help you to set up a comfortable and encouraging workspace.

The most important first step, find your spot!!
It does not matter if this spot is your basement, or an empty spot next to the washing machine (though I won’t recommend that), or a small chair next to an infant bed, or simply be a seat you put in the living room. Try to get yourself acquainted to the spot before you make up your mind. A good work spot should be comfortable for both your physics and psych. For example, it is okay to work in a coffee shop. However, you probably don’t want to go paint or write at a bar 11pm at night. You might get hangover the next day instead of a finished piece; You might not want to paint at a daycare: are you sure you can remain concentrated and be responsible to your work when you have 18 kids screaming in the background? (No offense to children. But seriously?)
A good work space should allow you a certain amount of privacy even though there might be other people or things around as potential distractions. It should not trigger any strong negative emotions from you, such as irritation, frustration, sadness or insecurity. (Notice: Insecurity does not equal to your reluctance to painting. If you still feel uncomfortable about the painting process itself, see this post for how to get over your initial fear)

The second step would be to create a barricade.
If you have an independent room to use, that would be the best option. If not, use curtain, books, or other material when you are at home to mark your “territory”. Also, notify your family member or whoever might come talk to you that you’re in your zone, and they shall notify you, with the fundamental courtesy, before stepping into your area.
Next, get a good pair of headphones. Classical music is always a great companion and stimulation for art. From List to Schubert, one could always find the flawless peace in classical music. Also, I find RainyMood a very useful website. The sound of nature is quite soothing especially if one is facing a creator’s block.

Thirdly, carefully arrange your equipment
Not having a private studio means that we don’t have the right to randomly dispose paints, sponges, knives and other equipment around us while we are working. Also, it means we MUST clean everything up immediately after our work is done.
The easiest way of minimizing this tedious and stressful experience would be categorizing your materials and equipment. Canvas can be stored separately in a cupboard or bookshelf, and only taken out when they’re needed; As for paints, I encourage people to try out different media before they make up their mind on specializing in one. Therefore, the best way would be categorizing your paint according to types, and then colors. Artist’s cases sold at supply stores are always a good choice. Get something that is small, portable, and stick to a specific type of case, so you can stack the cases up neatly when you don’t need them.
Do the same thing with colored pencils, pastels, markers etc. I understand that they might originally come in nice packages, however, it is still better to get an actual case for them, especially for pencils and pastel, whose original packages are rarely solid enough to be taken around to your different painting locations all the time.

Forth, a comfortable seat
You would be surprised how much magic a comfortable seat does to your artwork. If you are going to a public library, or coffee shop, bring a nice, small mattress for you. On the other hand, enjoy the luxury of an actual single-person sofa or soft chair when you paint at home. A small, tall stool is also a good choice when you go work at studios on college campus, or are simply doing quick sketches in a museum.
Do notice, pay attention to the lower part of your spine. You don’t want to use a mattress that is overly soft since it causes pain to your lower back if you stay seated for too long. You would like to find something that is healthy for your physical body — something that supports and allows you to stay at the same positions at least for an hour without any significant pain or sore.

Here are all the beginner’s tips for you! I was going to write about whether to use an easel or not, but then I realized that there are so much to talk about regarding this topic, so I decided to save it to another post.
If you find my post helpful, like it, follow me, and make a donation if possible. Also, visit my gallery on Artpal: EKwonderland and take a look at my works!

Donate button

Step by Step Tutorial: Flowerfield on a Cloudy Day

To purchase the finished painting or print, click here


Flowercloud

Acrylic, 2016, Flowerfield on a Cloudy Day

So today I’m going to write a step by step tutorial on this painting. First we will need to get some basic materials required to finish this painting, that will be:
a set of acrylic painting with extra white paint just in case
a set of brushes, and a glass of water (NOT TO DRINK FROM!)
one drawing pencil, preferably HB or 2B
a canvas (preferably 10in x 8in. I always suggest beginners to start with smaller canvases)
some nice music that helps you focus (PS: I will talk more about how to set a comfortable workplace in later posts)
a solid surface or an easel to place your canvas on.

Now let’s get going.

20160501_173547

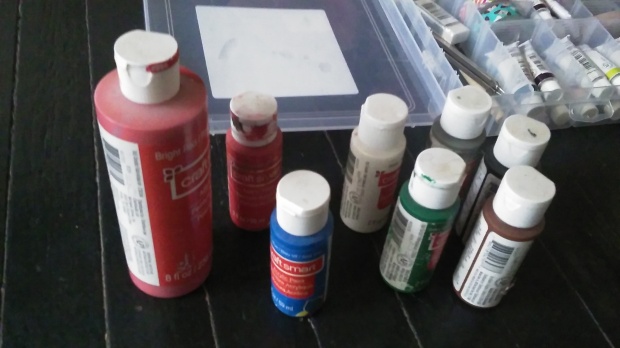
Step 1: Let’s pick out the color and brushes we are going to use. Here I picked out Red, Blue, Brown/Maroon, Green, Grey, and White.
For brushes, I picked two smaller point tip brushes, one larger-size round tip, and one larger-size flat.

20160501_173742

Step 2: Outline with drawing pencil on the canvas what we are going to paint. All we need is lines separating the sky from the flower field, and sky from the faraway mountains. (I wasn’t able to take a picture of this step as it was a little dark in my room so I couldn’t clearly capture the pencil line)

Step 3: Paint the sky.

20160501_174559

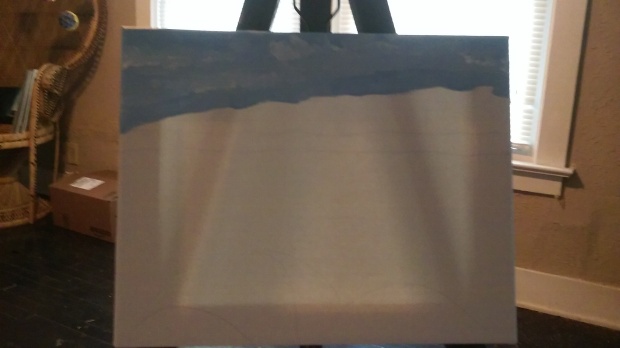
Mix blue, grey and white color together and thickly apply to the sky part that you outlined with the flat brush. Wait till it dries a little bit, then use the side of the flat brush, dip in blue and white and create a lighter color. Randomly and slightly brush through to create a cloudy effect. You can use a hair-dryer to blow dry your paint. It is much efficient than simply sitting and wait for it to dry especially on moist days.

Step 4: Paint the mountains

20160501_175242

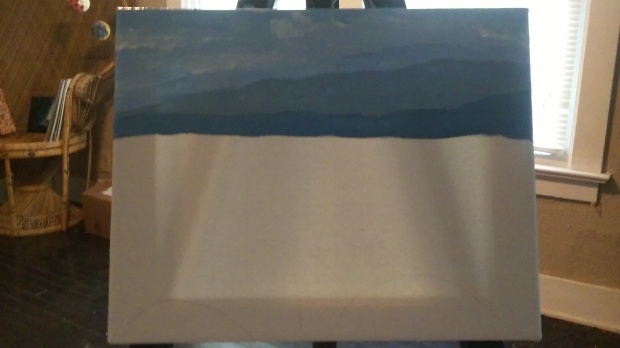
Now we are going to move to the mountains. Make sure your sky was completely dried (or blow-dried, lol) before you move on to this step. Mix blue, grey and a little white to create a heavier color. Still using the flat brush, heavily apply it to the top layer of mountain. Then, add more grey and blue, and thickly make the second layer.

You don’t have to wait for the top half mountain to completely dry to apply the bottom half this time. This way we create a natural transition between different values of color and achieve a natural monochrome combination.

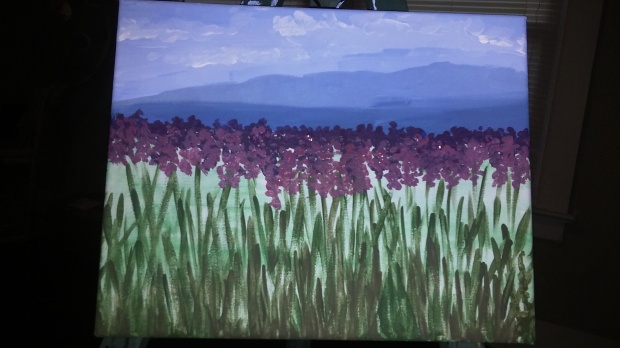
Step 5: Paint the background color for the grass

20160501_181926

Use a wet brush, and paint a thin layer of green. You might notice how quickly the canvas sucks in the water, so be sure to keep putting more water into the paint. Notice the random texture and light color that seems quite similar to watercolor? This technique is called wash. I will talk about it a little more in different posts later. Now don’t worry about the inconsistency of this part. We will cover most of this part later.

Step 6: Grass/Flower stems

20160501_183336

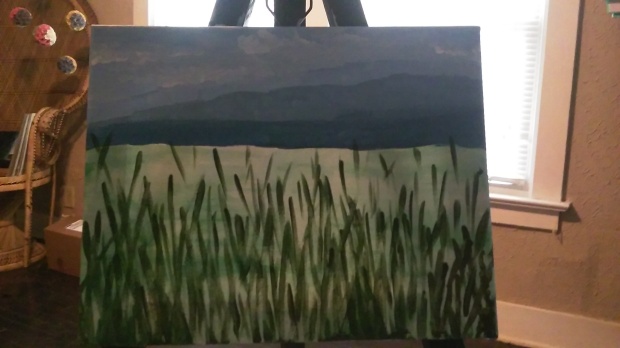
Use a smaller pointy brush and mix green and brown together. Randomly put up stems as guidance for the direction of your flowers. There are two things you need to pay attention to at this point: Make sure your stems are consistent, which means we don’t want weird, horizontal ones that doesn’t fit the law of nature… Also, the density of stems should be larger at the bottom and lighter closer to the horizontal line.

Step 7: flowers

Before doing this, make sure your grass were completely dried! Go eat a cookie, stand up and move around, since we have the longest and most tedious part of this project coming up!
Now mix red and blue, and create a dark purple color (if you have dark purple, then skip this step.)

Next, use the dry small pointy brush. Dip it in the purple and closely dot out the top layer of flower. When you are doing this, make sure you are going alone the (imaginary) stem direction. Think about lavenders. That is how your flower petals should look like.wp-1462148770692.jpg

Be aware that during this section we always wait till the precedent layer is nearly completely dry before moving on. This will take a while, but believe me it worth the patience.
Now mix in some more red, and maybe a little bit white. Dot on a second layer. We are gonna go from dark to light on the top section of the flower field.

20160501_191254

You should have something like this. This is the top part of the field. Blow dry or wait till it is completely dried. Then we are going to start another layer of flower. Mix out really violet-pink. Dot it on. Wait, and dot on some red. Wait, then dot on some really bright pink to lighten it up.

20160501_192426

This is how it looks. Again, stand up and go eat some icecream, or do some dishes, or simply stretch your body. By the time you are through with that, your painting should be dried.

20160501_193555
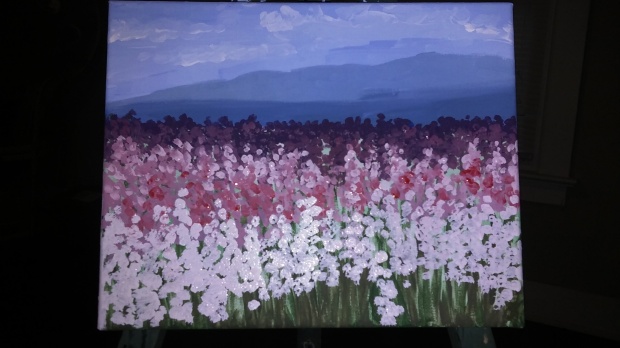
Change to the larger round tip brush.
Mix out light white-pink. With dry brush tip, adapt and dot the paint onto the canvas. You want the paint to be thick so you get a nice texture. Keep waiting. Let it dry. It’s looking better, isn’t it?

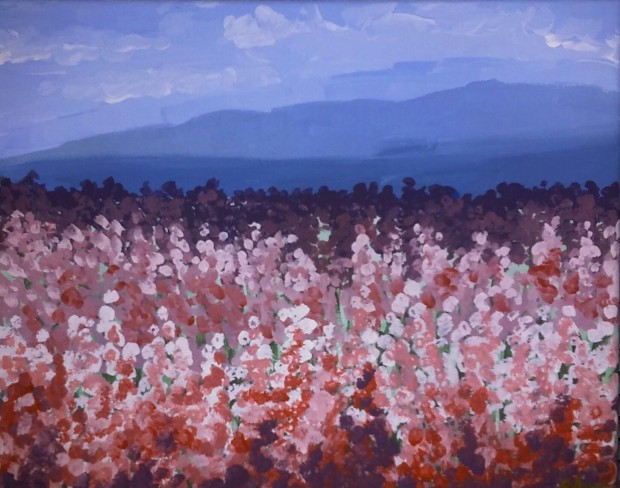
Okay now bad news, I forgot to take the step pictures from now on… So I will try my best to explain how it jumped from this picture above to the picture below…

First, mix out the peach color, and dot it on. When you’re doing this, make sure it kind of goes around the white pink we just dotted. Then, wait until it is half-dry, and add more red into your paint, and apply it following the same route. Imagine you are adding shadow to a drawing of tower! Then make heavy, dark purple, keep dotting the rest of the field to create a strong contrast of color.

And Voila!

20160501_205340~2

Tips:

  1. I recommend you to paint the edge as you are moving on if you’re using a stretched canvas like I did. It gives you the best consistency of color, and saves you the trouble of coming back and remix the color.
  2. Hair-dryer is very useful for paintings like this. But if you don’t have one, try face your canvas at a fan.
  3. When painting the flowers, always go alone the stems. Although the stems are mostly going to be covered, this technique makes your flower looks more natural.

This is my first tutorial, and feel free to give me feedback! If you find this tutorial helpful, donation is always a good way to support and acknowledge my work.
Donate button

Overcome the fear: first step towards painting

If I am given the authority to answer the question “how can you paint” or  “why do you paint”, I would simply state that painting, like crafting and other creative activities, is a nature talent endowed to every human being by our almighty creator.

I have encountered several individuals who had the capability to draw fairly impressively and creatively, however, whenever the topic moves towards painting, they almost always shake their heads in reluctance and fear.

The most frequent responses I receive would be “Well, I’m not very good at painting”, or “I don’t know… it just doesn’t really seem like my thing.” My friends are often amazed when witnessing me going around with my giant bag of painting tools, cases of paints and canvases. “How can you just paint all the time?” One of my friend once asked, seeing me playing on my canvas when she was writing a report, “I mean, just how the heck do you have so much energy and imagination?”

Well, I found that question rather interesting, because I actually do not have that much imagination. And energy? None of my friend would put that tag on me. Because Jeez, I fall asleep on the bus or in the line all the time. If I am given the authority to answer the question “how can you paint” or  “why do you paint”, I would simply state that painting, like crafting and other creative activities, is a nature talent endowed to every human being by our almighty creator.

Frankly speaking, painting, especially painting on canvas, does has an intimidating appearance. Whenever you see someone painting, the first you recognize might as well be the impressive mess that person creates around him/herself: paint brushes in a cup of muddy water that somewhat shares similar appearance to restricted contaminating chemical; color plates or wood palettes needing intense and long-time washing to be restored to its original state; and tubes, bottles, cubes of different media that vary from acrylic to unknown mysterious matter that looks quite suspicious.

I am not going to say that I never had the fear of doing actual painting. Indeed, I was once terrified when facing a canvas as well. Even today, I still have the creator’s block when I have a blank page of notebook or an untouched canvas in front of me. Nonetheless, I have cultivated my own skills to get over the fair of serious creation, and the most important part of it is to forget about the stress we are placing on ourselves.

I wonder if you, my reader, has had the same experience. When you have a regular notebook in front of you, you naturally begin doodling regardless of the outcome. If the drawing isn’t satisfactory enough, you simply start on another spot: maybe in the margin of a textbook, or simply a piece of kleenex. However, if you’re aware that you’re going to paint, the pencil in your hand suddenly turned heavier. The fact that you do not have the chance to toss it away and start somewhere else when painting on watercolor paper or canvas, especially considering the monetary investment you did on these materials, becomes a harsh burden that murdered a lot of creative ideas.

But oh my dear, shall not you understand: it is always the most important to make your first attempt, and then everything would become much easier.

Now, for those who find it intimidating to paint, here are a couple useful tips for you:

1. Always be confident about yourself. Understand that every human being was born wired with creativity. It is the essence of human civilization, and please, do give yourself a chance. It doesn’t have to start with painting. Simply challenge something you have always had a block on the way: write a stage play, draw an anime character, record a dance video, etc… This stage is to get yourself over the subconscious of embarrassment stage where you keep telling yourself that you will not succeed and others will only find you hilarious and awkward.

2. Find someone who is supportive. Although I personally always say that it is all up to yourself to be creative and productive, it is very helpful, especially for beginners, to find a supportive partner. It could be your spouse, your children, or your parents. And it could also be a friend you trust. However, do not neglect the difference between being supportive and tolerant. A supportive partner still sees your flaws and helps you correct it. This is necessary as we all prefer compliments then harsh critics though the latter is what actually makes us better. That person should be the one who keeps telling you that you’re doing a good job, and it should always be the person who tells you to get your butt over in front of that canvas/computer/knitting when you are in self-denial.

3. A comfortable workspace. Although we see artists painting in various locations from a crowd coffee shop to the side of streets, it is best for beginners to paint at a comfortable location where one doesn’t feel spied on. Believe me or not, outsider’s observation can be quite stressful for someone who just started to paint. Therefore, it is important to start with somewhere that has a low-level of disturbance when one first begins to create creative works. My best suggestion, of course, would be one’s own bedroom. Also, the art-studio on college campus is also a convenient choice as one is allowed to leave paint marks on the table/floor without the obligation of thoroughly cleaning it up. It makes it a lot less stressful if one does not worry about the side-effect of one’s painting.

If you are interested in knowing where to start your painting journey, keep following my posts. In the meantime, support me by donation if you would, and feel free to take a look at my gallery on ArtPal: visit EKwonderland

Donate button